

4.0
Owner's of the Onkyo Stereo Receiver Onkyo Stereo Receiver gave it a score of 4.0 out of 5. Here's how the scores stacked up:

Advanced Operations
En-67
Operating
procedure
(➔ page 52)
Network
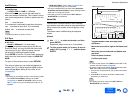
This section explains how to configure the AV
receiver’s network settings manually.
After modifying the network settings, you must
confirm the changes by executing “Save”.
If your router’s DHCP server is enabled, you don’t
need to change any of these settings, as the AV
receiver is set to use DHCP to configure itself
automatically by default (i.e., DHCP is set to
“Enable”). If, however, your router’s DHCP server is
disabled (you’re for example using static IP), you’ll
need to configure these settings yourself, in which
case, a knowledge of Ethernet networking is
essential.
What’s DHCP?
DHCP (Dynamic Host Configuration Protocol) is used
by routers, computers, the AV receiver, and other
devices to automatically configure themselves on a
network.
What’s DNS?
The DNS (Domain Name System) translates domain
names into IP addresses. For example, when you
enter a domain name such as www.onkyousa.com in
your Web browser, before accessing the site, your
browser uses DNS to translate this into an IP
address, in this case 63.148.251.142.
■ Network Connection
`Wired
`Wireless
This setting determines whether you connect the AV
receiver to network by wired LAN or wireless LAN. If
you connect by wireless LAN, select “Wireless”. See
“Performing Wireless LAN Setup” for setting
(➔ page 27).
Tip
• The same setting is available even if “Wireless” is selected
in “Network Connection” in initial setup (➔ page 23).
■ MAC Address
This is the AV receiver’s MAC (Media Access
Control) address. This address cannot be changed.
■ DHCP
`Enable
`Disable
This setting determines whether or not the AV
receiver uses DHCP to automatically configure its IP
Address, Subnet Mask, Gateway, and DNS Server
settings.
Note
• If you select “Disable”, you must configure the “IP
Address”, “Subnet Mask”, “Gateway”, and “DNS Server”
settings yourself.
■ IP Address
`Class A:
“10.0.0.0” to “10.255.255.255”
`Class B:
“172.16.0.0” to “172.31.255.255”
`Class C:
“192.168.0.0” to “192.168.255.255”
Enter a static IP address provided by your Internet
Service Provider (ISP).
Most routers use Class C IP addresses.
■ Subnet Mask
Enter the subnet mask address provided by your ISP
(typically 255.255.255.0).
■ Gateway
Enter the gateway address provided by your ISP.
■ DNS Server
Enter the DNS server address provided by your ISP.
■ Proxy URL
To use a Web proxy, enter its URL here.
■ Proxy Port
If you’re using a Web proxy, enter a proxy port
number here.
■ Network Standby
`On
`Off
This setting enables or disables control over the
network.
When enabled, the NET indicator will be dimly-lit
while the AV receiver is in standby mode. Note that
the indicator may not light under certain conditions
(➔ page 22).
Note
• When set to “On”, the power consumption slightly
increases in standby mode.
■ Update Notice
`Enable
`Disable
When this setting is enabled, you will be notified if a
firmware update via network of high importance is
available.
Note
• Selecting “Never Remind me” on the notification window
will switch this setting to “Disable” (➔ page 22).
• For details on the update notification, see “Firmware
Update Notification” (➔ page 22).


Find Your Products By Category
Please Login
