

4.0
Owner's of the Onkyo Stereo Receiver Onkyo Stereo Receiver gave it a score of 4.0 out of 5. Here's how the scores stacked up:


Playback
En-37
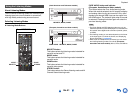
You need to connect the AV receiver to your home
network (➔ pages 16, 27).
Tip
• The on-screen menus appear only on a TV that is
connected to HDMI OUT MAIN.
Remote playback is supported by Windows Media
Player 12.
Remote Playback means you can play the music files
stored on a media server or personal computer with
the AV receiver by operating the controller device in
the home network.
Windows Media Player 12 Setup
This section explains how to configure Windows
Media Player 12 so that the AV receiver can play the
music files stored on your personal computer.
Using Remote Playback
Note
• Remote playback cannot be used in any of the following
cases:
–Network services are being used.
–Contents are being played from a USB device.
–“Agree” is not selected on the “DISCLAIMER” screen
displayed on the TV when you select the NET input
selector on the AV receiver for the first time.
Remote Playback
1
Start Windows Media Player 12.
2
On the “Stream” menu, select “Turn on media
streaming”.
A dialog box appears.
Tip
• If the media streaming is already activated, clicking on
“More streaming options...” in the “Stream” menu will
display a list of the playback devices connected to the
network. You can skip step 3.
3
Move your cursor and click on “Turn on media
streaming”.
A list of media server appears. Wording may vary
slightly depending on the network location.
4
On the “Media streaming options”, select the
AV receiver and confirm that it is set to
“Allowed”.
5
Click “OK” to close the dialog box.
This completes the Windows Media Player 12
configuration.
You can now play the music files in your
Windows Media Player 12 library.
Tip
• On the “Stream” menu, confirm that “Allow remote
control of my Player...” is checked.
1
Turn on the AV receiver.
2
Start Windows Media Player 12.
To enable remote playback, you must first
configure Windows Media Player 12.
3
On Windows Media Player 12, right-click on a
music file.
The right-click menu appears.
Tip
• For selecting another media server, select the desired
media server from the “Other Libraries” menu on
Windows Media Player 12.
4
Select the AV receiver in “Remote playback”.
The “Play to” window appears and playback on
the AV receiver starts. Operations during remote
playback can be made from the “Play to” window
of Windows 8/Windows 7 on your personal
computer.
A playback screen will be displayed on the
connected TV.
Tip
• If the operating system of your personal computer is
Windows 8, click “Play to” and select the AV receiver.
5
Adjusting the Volume.
You can adjust the volume by adjusting the
volume bar in the “Remote playback” window.
The default maximum volume level is 64. If you
wish to change this, enter the value from the Web
Setup in your browser. Refer to step 3 of
“Registering Other Internet Radio” for details
(➔ page 34).
The volume value of the remote window and the
volume value of the AV receiver may not always
match.
Adjustments you make to the volume in the AV
receiver will not be reflected in the “Remote
playback” window.


Find Your Products By Category
Please Login
