
0
Owner's of the Onkyo Stereo Receiver TX-NR3008 gave it a score of 0 out of 5. Here's how the scores stacked up:


84
En
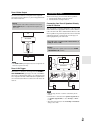
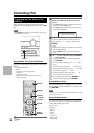
Controlling Zone 2/3 with the Remote
Controller
Note
• To control Zone 2/3, you must press the remote controller’s
ZONE first.
• ZONE turns red while Zone 2 is on, and green while Zone 3 is
on.
Note
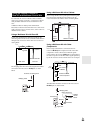
• Only analog input sources are output by the ZONE 2/3 PRE
OUT and FRONT WIDE/ZONE 2 L/R, SURR BACK/ZONE
3 L/R terminals. Digital input sources are not output. If no sound
is heard when an input source is selected, check if it’s connected
to an analog input.
• You cannot select different AM or FM radio stations for your
main room and Zone 2/3. The same AM/FM radio station will be
heard in each room. For example, if you have an FM station for
the main room, that station will also be used in Zone 2.
• When you connect Zone 3 speakers directly to the AV receiver,
listening modes that require surround back speakers such as
Dolby EX, DTS-ES or THX Surround EX are unavailable.
• When the input selector of Zone 2/3 is selected, power consump-
tion on standby mode slightly increases.
• While Zone 2/3 is on, functions will not work.
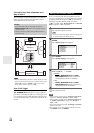
Adjusting the Volume for Zones
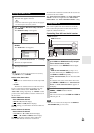
Muting Zones
Adjusting the Tone and Balance of Zones
Note
• Zones can also be unmuted by adjusting the volume.
• The Zone 2 volume, tone, and balance function have no effect on
ZONE 2 PRE OUT when the “Zone 2 Out” setting is set to
“Fixed” (➔ 83) and “Powered Zone 2” setting is set to “Not
Act” (➔ 82).
• The Zone 3 volume, tone, and balance function have no effect on
ZONE 3 PRE OUT when the “Zone 3 Out” setting is set to
“Fixed” (➔ 83) and “Powered Zone 3” setting is set to “Not
Act” (➔ 82).
• Even if you repeatedly press the remote controller’s ZONE to
select zones, the last zone selection will be retained once you
have switched to other components by pressing other REMOTE
MODE after pressing ZONE.
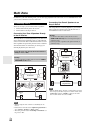
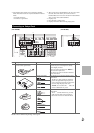
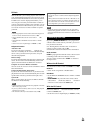
1
Press ZONE repeatedly, then point the remote
controller at the AV receiver and press ON.
Tip
•The ZONE 2/3 12V TRIGGER OUT goes high (+12 V).
2
To select an input source for Zone 2/3, press
ZONE repeatedly, followed by INPUT SELEC-
TOR.
To select AM or FM, press TUNER input selector
and ZONE repeatedly.
(North American models) You can also select SIR-
IUS.
3
To turn off Zone 2/3, press ZONE repeatedly, fol-
lowed by STANDBY.
INPUT
SELECTOR
ON
ZONE
STANDBY
On the remote controller, press ZONE repeatedly,
and then use VOL / .
On the AV receiver, press ZONE 2 or ZONE 3
(the ZONE 2/3 indicator and Zone 2/3 selector on
the display flashes) and press LEVEL followed by
Up /Down within 8 seconds.
On the remote controller, press ZONE repeatedly,
and then press MUTING.
To unmute a zone, on the remote controller, press
ZONE, and then press MUTING again.
1
On the AV receiver, press ZONE 2 or ZONE 3.
2
Press the AV receiver’s TONE repeatedly to select
“Bass”, “Treble” or “Balance”.
3
Use / to adjust the bass, treble or balance.
• You can boost or cut the bass or treble from –10 dB
to +10 dB in 2 dB steps.
• You can adjust the balance from 0 in the center to
+10 dB to the right or +10 dB to the left in 2 dB
steps.


Find Your Products By Category
Please Login
