
0
Owner's of the Onkyo Stereo Receiver TX-NR3008 gave it a score of 0 out of 5. Here's how the scores stacked up:

48
En
■ Resolution
You can specify the output resolution for the HDMI
output
and COMPONENT VIDEO MONITOR OUT and have
the AV receiver upconvert the picture resolution as neces-
sary to match the resolution supported by your TV.
`Through
*1
:
Select this to pass video through the AV receiver at
the same resolution and with no conversion.
`Auto
*2
:
Select this to have the AV receiver automatically
convert video at resolutions not supported by your
TV.
`480p (480p/576p):
Select this for 480p or 576p output and video con-
version as necessary.
`720p:
Select this for 720p output and video conversion as
necessary.
`1080i:
Select this for 1080i output and video conversion as
necessary.
`1080p
*2
:
Select this for 1080p output and video conversion as
necessary.
`1080p/24
*2
:
Select this for 1080p output at 24 frames per second
and video conversion as necessary.
`Source:
Output will be according to the resolution level
which was set in the “Picture Adjust” setting
(➔ 60).
Tip
•The “Resolution” setting is set respectively of main, sub, and
analog.
Note
•If the “Monitor Out” setting is set to “Both”, this setting is fixed
at “Auto”.
• Depending on the incoming video signal, video playback may
not be smooth or the vertical resolution may be lowered. In this
case select other than “1080p/24”.
*1
PC IN (Analog RGB) input signal is output at 480p (480p/
576p), 720p, 1080i resolution when the “Monitor Out” set-
ting is set to “Analog” (➔ 47) and the “Resolution” setting is
set to “Through”.
*2
These settings are not available when the “Monitor Out” set-
ting is set to “Analog” (➔ 47).
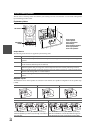
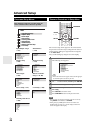
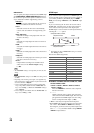
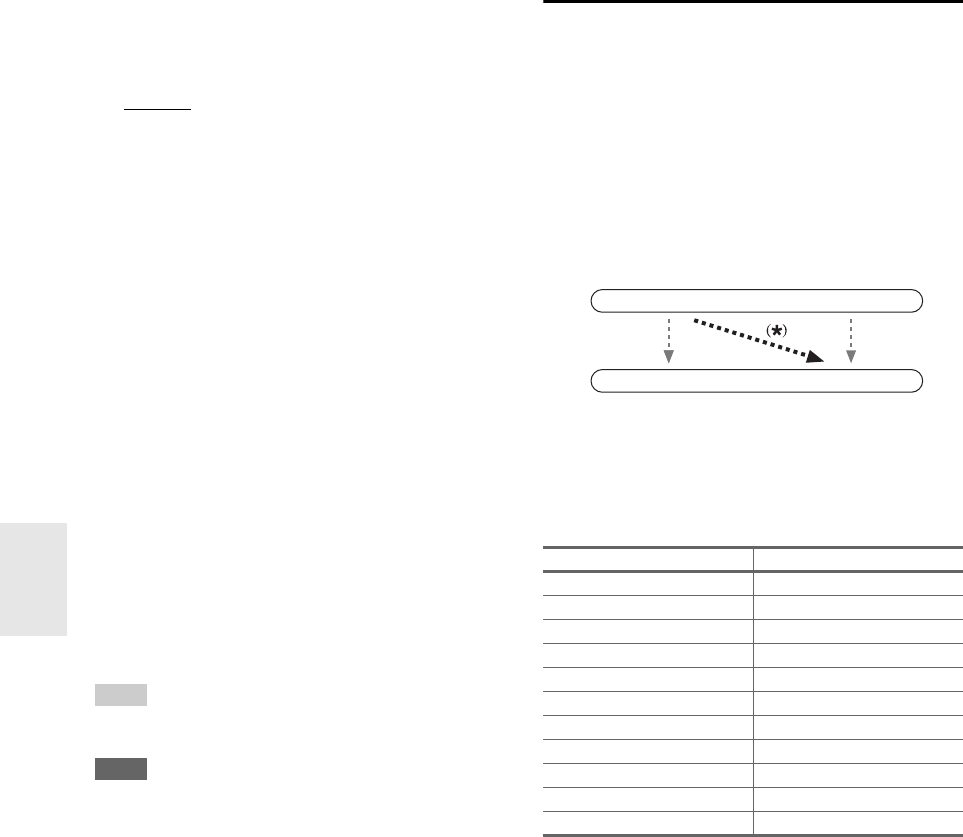
HDMI Input
If you connect a video component to an HDMI input, you
must assign that input to an input selector. For example, if
you connect your Blu-ray Disc/DVD player to HDMI
IN 2, you must assign “HDMI 2” to the “BD/DVD” input
selector.
If you’ve connected your TV to the AV receiver with an
HDMI cable, composite video, S-video and component
video sources can be upconverted
*
and output by the
HDMI output
*1
. You can set this for each input selector by
selecting the “-----” option.
*1
This applies only when “Monitor Out” setting is set to other
than “Analog” (➔ 47).
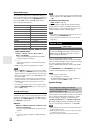
Here are the default assignments.
■ BD/DVD, VCR/DVR, CBL/SAT, GAME, PC, TAPE,
TV/CD, PHONO, PORT
`HDMI 1, HDMI 2, HDMI 3, HDMI 4, HDMI 5,
HDMI 6, HDMI 7:
Select the HDMI IN to which the video component
has been connected.
`-----:
Output composite video, S-Video, and component
video sources from the HDMI output. The video out-
put signal from the HDMI output is the one config-
ured in “Component Video Input” (➔ 49).
•“AUX” is used only for input from the front panel.
• Each HDMI input cannot be assigned to two input selec-
tors or more. When HDMI 1 - HDMI 7 have already
been assigned, you must set first any unused input selec-
tors to “-----” or you will be unable to assign HDMI 1
- HDMI 7 to input selector.
Input selector Default assignment
BD/DVD HDMI 1
VCR/DVR HDMI 2
CBL/SAT HDMI 3
GAME HDMI 4
PC HDMI 5
AUX FRONT (Fixed)
TAPE -----
TUNER ----- (Fixed)
TV/CD -----
PHONO -----
PORT -----
IN
OUT
Composite video, S-Video,
component video
Composite video, S-Video,
component video
HDMI
HDMI


Find Your Products By Category
Please Login
