
0
Owner's of the Onkyo Stereo Receiver TX-NR3008 gave it a score of 0 out of 5. Here's how the scores stacked up:


76
En
Using Remote Playback
Note
• When modifying network settings, after modifying it is neces-
sary to execute “Save”.
This section explains how to configure the AV receiver’s
network settings manually.
If your router’s DHCP server is enabled, you don’t need to
change any of these settings, as the AV receiver is set use
DHCP to configure itself automatically by default (i.e.,
DHCP is set to Enable). If, however, your router’s DHCP
server is disabled, for example, you’re using static IP
addresses, you’ll need to configure these settings yourself,
in which case, a knowledge of Ethernet networking is
essential.
What’s DHCP?
DHCP (Dynamic Host Configuration Protocol) is used by
routers, computers, the AV receiver, and other devices to
automatically configure themselves on a network.
What’s DNS?
The DNS (Domain Name System) translates domain
names into IP addresses. For example, when you enter a
domain name such as www.onkyousa.com in your Web
browser, before accessing the site, your browser uses DNS
to translate this into an IP address, in this case
63.148.251.142.
1
Start Windows Media Player 12.
Before remote playback, setup on Windows Media
Player 12 is required.
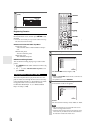
2
On the product, press NET/USB to select the
server screen.
A list of media server appears.
Tip
•The NETWORK indicator on the product’s display lights
up. When it flashes, confirm the network connection.
Note
• While the music files on another media server are being
played, remote playback cannot be used. Stop playback on
another media server.
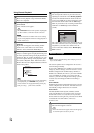
3
On Windows Media Player 12, right-click on
music file.
Right-click menu appears. For selecting another
media server, select media server from “Other
Libraries” menu on Windows Media Player 12.
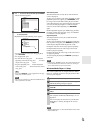
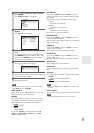
4
Select the product from right-click menu.
“Play to” window appears and playback on the prod-
uct starts. Operations during remote playback can be
made from “Play to” window of Windows 7 on your
personal computer. During remote playback, opera-
tions (such as Playback, Pause, Fast Forward, Fast
Rewind, Previous, Next, Repeat, Random) cannot be
made on the product.
Tip
• To stop playback and return to the previous menu during
remote playback, press RETURN on the product or
remote controller. To stop playback during remote play-
back, press Stop [ ] on the remote controller.
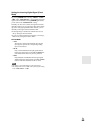
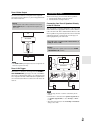
Remote Playback
My favorite song 1
Artist name
My favorite album
MP3 128kbps 44.1kHz
1:00:00
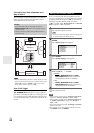
5
Adjusting the Volume
You can adjust the volume of your AV receiver by
adjusting the volume bar in the “Remote playback”
window. The default maximum volume for the AV
receiver is 82 (0dB). If you wish to change this, enter
the maximum volume value from the WEB Setup
Menu in your browser. See “Listening to Other Inter-
net Radio” for WEB Setup menu information
(➔ 71).
The volume value of the remote window and the vol-
ume value of the AV receiver may not always match.
Adjustments you make to the volume in the AV
receiver will not be reflected in the “Remote play-
back” window.
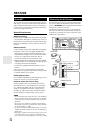
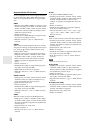
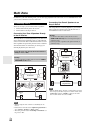
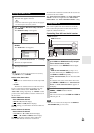
Network Settings
1
Press RECEIVER followed by SETUP.
The main menu appears onscreen.
Tip
• If the main menu doesn’t appear, make sure the appropri-
ate external input is selected on your TV.
Unit Information
WEB Setup Menu
Preset Internet Radio
Save Refresh
Network setting
Machine Name XXXXXXXX
Friendly Name XXXXXXXX
MAC Address xx : xx : xx − yy : yy : yy
DMR Max Volume 82
(0-100)
Auto Play Yes
Product info


Find Your Products By Category
Please Login
