
0
Owner's of the Onkyo Stereo Receiver TX-NR3008 gave it a score of 0 out of 5. Here's how the scores stacked up:
31
En
When you connect an -capable Onkyo component, you
must configure the input display so that can work
properly.
This setting can be done only from the front panel.
Note
• DOCK can be selected for the TAPE, GAME or VCR/DVR
input selector, but not at the same time.
• Enter the appropriate remote control code before using the
remote controller for the first time (➔ 91).
Note
• Always turn down the volume before connecting your head-
phones.
• While the headphones plug is inserted in the PHONES jack, the
Headphone indicator, speaker/channel indicator FL and FR
lights. (The Powered Zone 2/3 speakers are not turned off.)
• When you connect a pair of headphones, the listening mode is
set to Stereo, unless it’s already set to Stereo, Mono, Direct, or
Pure Audio.
• Only the Stereo, Direct, Pure Audio, and Mono listening modes
can be used with headphones.
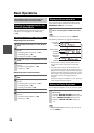
You can use ACTIVITIES to execute a number of remote
control operations with a single button.
This button has the following two modes.
`Easy Macro mode:
You can turn on and off the AV receiver, playback
components and TV.
`Normal Macro mode:
You can assign desired operations (➔ 96, 98).
Note
• If you set any one of the ACTIVITIES to Normal Macro mode,
all the ACTIVITIES will be set to Normal Macro mode.
•To use ACTIVITIES, first assign the remote control codes of the
AV components you are using (➔ 93).
Starting Components Using ACTIVITIES
*1
Depending on the start-up time of the playback component,
the AV receiver may not be able to activate the playback com-
mand. In this case, press on the remote controller.
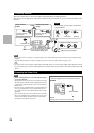
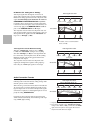
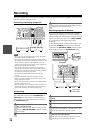
Changing the Input Display
1
Press TAPE, GAME or VCR/DVR so that
“TAPE”, “GAME” or “VCR/DVR” appears on
the display.
2
Press and hold down TAPE, GAME or VCR/DVR
(about 3 seconds) to change the input display.
Repeat this step to select “MD”, “CDR” or
“DOCK”.
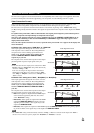
For the TAPE input selector, the input display
changes in this order:
For the GAME input selector, the setting changes in
this order:
For the VCR/DVR input selector, the setting
changes in this order:
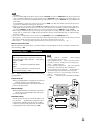
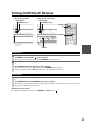
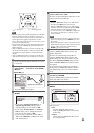
Using Headphones
Connect a pair of stereo headphones with a stan-
dard plug (1/4 inch or 6.3 mm) to the PHONES
jack.
TAPE → MD → CDR
DOCK
→
→
GAME ↔ DOCK
VCR/DVR ↔ DOCK
Using ACTIVITIES to Start Easy Macros
Press MY MOVIE, MY TV, or MY MUSIC.
At purchase, ACTIVITIES are set to Easy Macro
mode as the default setting.
The default actions are described below.
MY MOVIE:
1. The TV turns on.
2. The playback component assigned to BD/DVD
of REMOTE MODE turns on.
3. The AV receiver turns on.
4. The input selector of the AV receiver is set to
BD/DVD.
5. Playback begins on the playback component
assigned to BD/DVD.
*1
MY TV:
1. The TV turns on.
2. The playback component assigned to CBL/SAT
of REMOTE MODE turns on.
3. The AV receiver turns on.
4. The input selector of the AV receiver is set to
CBL/SAT.
MY MUSIC:
1. The playback component assigned to TV/CD of
REMOTE MODE turns on.
2. The AV receiver turns on.
3. The input selector of the AV receiver is set to
TV/CD.
4. Playback begins on playback component
assigned to TV/CD.
*1
Note
• After pressing one of the ACTIVITIES, you cannot use
other ACTIVITIES until the assigned actions have been
completed.
• If you wish to use another of the ACTIVITIES after start-
ing, press ALL OFF and then press the desired ACTIVI-
TIES.


Find Your Products By Category
Please Login
