

0
Owner's of the Onkyo Stereo Receiver Onkyo HTS3500 5.1 Channel Home Theater System gave it a score of 0 out of 5. Here's how the scores stacked up:

Appendix
En-57
■ The AV receiver’s remote controller doesn’t
control my iPod/iPhone
■ The AV receiver unexpectedly selects my
iPod/iPhone as the input source
■ iPod/iPhone doesn’t work properly
■ Can’t record
■ Can’t access the music files on a USB device
■ Standby power consumption
■ The sound changes when I connect my
headphones
■ How do I change the language of a multiplex
source
■ The functions don’t work
■ The following settings can be made for the
composite video inputs
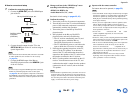
You must use the buttons on the unit to make these
settings.
On the AV receiver, press the input selector for the input
source that you want to set and the SETUP button
simultaneously. While holding down the input selector
button, press SETUP until “Video ATT :On” appears
on the AV receiver’s display. Then, release both buttons.
To turn the setting off, repeat the above process so that
“Video ATT :Off” appears on the AV receiver’s
display, and release the buttons.
• Video Attenuation
This setting can be made for the BD/DVD, VCR/DVR,
CBL/SAT, GAME, AUX, or USB input.
If you have a games console connected to the composite
video input, and the picture isn’t very clear, you can
attenuate the gain.
Video ATT :Off: (default).
Video ATT :On: Gain is reduced by 2 dB.
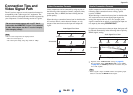
■ If the picture on your TV/monitor connected to
the HDMI OUT is unstable, try switching the
DeepColor function off
To turn off the DeepColor function, simultaneously
press the CBL/SAT and ON/STANDBY buttons on
the AV receiver. While holding down CBL/SAT, press
ON/STANDBY until “Deep Color: Off” appears on
the AV receiver’s display. Then, release both buttons.
To reactivate the DeepColor function, repeat the above
process until “Deep Color: On” appears on the AV
receiver’s display and release the buttons.
Make sure your iPod/iPhone is properly inserted in
the Dock. If your iPod/iPhone is in a case, it may not
connect properly to the Dock. Always remove your
iPod/iPhone from the case before inserting it into the
Dock.
—
The iPod/iPhone cannot be operated while it’s
displaying the Apple logo.
—
Make sure you’ve selected the right remote mode. 49
When you use the AV receiver’s remote controller,
point it toward your AV receiver.
—
If you still can’t control your iPod/iPhone, start
playback by pressing your iPod/iPhone model’s Play
button. Remote operation should then be possible.
—
Try resetting your iPod/iPhone. —
Depending on your iPod/iPhone, some buttons may
not work as expected.
—
Always pause iPod/iPhone playback before selecting
a different input source. If playback is not paused, the
Direct Change function may select your iPod/iPhone
as the input source by mistake during the transition
between tracks.
—
Try reconnecting your iPod/iPhone. —
Recording
On your recorder, make sure the correct input is
selected.
—
To prevent signal loops and damage to the AV
receiver, input signals are not fed through to outputs
with the same name (e.g., VCR/DVR IN to
VCR/DVR OUT).
—
USB Device Playback
Make sure the USB device is plugged in properly. —
The AV receiver supports USB devices that support
the USB mass storage device class. However,
playback may not be possible with some USB devices
even if they conform to the USB mass storage device
class.
63
USB memory devices with security functions cannot
be played.
24
Others
In the following cases, the power consumption in
standby mode may reach up to a maximum of 31 W:
–“HDMI Ctrl (RIHD)” setting is set to “On”.
(Depending on the TV status, the AV receiver will
enter standby mode as usual.)
–The “HDMI Through” setting is set to other than
“Off”.
45
When a pair of headphones is connected, the listening
mode is set to Stereo, unless it’s already set to Stereo,
Mono, or Direct.
—
Use the “Input Ch (Mux)” setting on the “Audio
Adjust” menu to select “Main” or “Sub”.
42
To use , you must make an connection and an
analog audio connection (RCA) between the
component and AV receiver, even if they are
connected digitally.
18


Find Your Products By Category
Please Login
