
3.0
Owner's of the Samsung DVD Player DVD-E360 gave it a score of 3.0 out of 5. Here's how the scores stacked up:


11
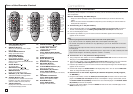
Using the Setup Menu
Changing setup menu
The Setup menu lets you customize your DVD player by allowing you to select various language prefer-
ences, set up a parental level, even adjust the player to the type of television screen you have.
1. With the unit in Stop mode, press the MENU button on the remote control. Press the √/® buttons
to select SETTINGS, then press the ENTER button.
2. Press the π/† buttons to select a Setup Menu, then press the ® or ENTER to bring up the sub-
menu.
3. Press the π/† buttons to select a sub-menu option, then press the ® or ENTER.
4. To make the setup screen disappear after setting up, press the RETURN button.
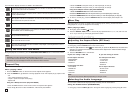
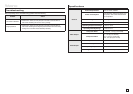
Setting Up the Display Options
Display options enable you to set various video functions of the player.
1. With the unit in Stop mode, press the MENU button. Press the √/® buttons to select SETTINGS,
then press the ENTER button.
2. Press the π/† buttons to select DISPLAY, then press the ® or ENTER button.
3. Press the π/† buttons to select the desired item, then press the ® or ENTER button.
Note
•ConsultyourTVUser’sManualtofindoutifyourTVsupportsProgressiveScan.If
ProgressiveScanissupported,followtheTVUser’sManualregardingProgressiveScanset-
tingsintheTV’smenusystem.
•IfVideoOutputissetincorrectly,thescreenmaybeblocked.
•Whentheresolutionischangedduringplayback,itmaytakeafewsecondsforanormal
image to appear.
2. Choose My Karaoke setting in Setting --> Audio --> My Karaoke and then select one of three enable
mode :
- Original Vocal : This setting will keep the original vocal sound.
- Min. Reduction : this setting reduce the main vocals sound sligthly.
- Max. Reduction : This setting will reduce the main vocals sound greatly
3. Insert and play DVD or VCD media, this feature only for VCD.DVD non karaoke type.
Note
1. Feature will disabled when :
- Removing the microphone, or
- Changing “My Karaoke” settings to “Original Vocals” or
- Playing Karaoke audio, or
- Playing non supported file type (ex : *.avi: *.mp3; *.divx; etc)
2. No pop-up notification when feature disabled.
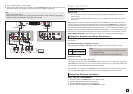
Setting Up the Audio Options
Audio Options allows you to setup the audio device and sound status settings depending on the audio
system in use.
1. With the unit in Stop mode, press the MENU button. Press the √/® buttons to select SETTING,
then press the ENTER button.
2. Press the π/† buttons to select AUDIO, then press the ® or ENTER button.
3. Press the π/† buttons to select the desired item, then press the ® or ENTER button.
Note :
- When play a disc that has MPEG Audio and you have Bitstream selected in the Audio Options menu,
the Digital Audio jack may not output audio
- There is no analogue audio output when you play a sound disc.
- Even when PCM Down sampling is Off
•Somediscswillonlyoutputdownsampledaudiothroughthedigitaloutputs.
Manufactured under license from Dolby Laboratories. “Dolby” and the double-D symbol are trade-
marks of Dolby Laboratories.
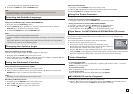
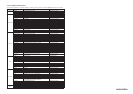
Setting Up the System Options
1. With the unit in Stop mode, press the MENU button. Press the √/® buttons to select SETTINGS,
then press the ENTER button.
2. Press the π/† buttons to select SYSTEM, then press the ® or ENTER button.
3. Press the π/† buttons to select the desired item, then press the ® or ENTER button.
Setting Up the Language Features
If you set the player menu, disc menu, audio and subtitle language in advance, they will come up auto-
matically every time you watch a movie.
1. With the unit in Stop mode, press the MENU button. Press the √/® buttons to select SETTINGS,
then press the ENTER button.
2. Press the π/† buttons to select LANGUAGE, then press the ® or ENTER button.
3. Press the π/† buttons to select the desired language, then press the ® or ENTER button.
Note
- The language is selected and the screen returns to Language Setup menu.
- To make the setup menu disappear, press the MENU button.
- If the selected language is not recorded on the disc, the original pre-recorded language is selected.
- Select “Original” if you want the defaultsoundtrack language to be the original language the disc is
recorded in.
- Select “Automatic” if you want the subtitle language to be the same as the language selected as the
audio language.
-
Some discs may not contain the language you select as your initial language; in that case the disc will use
its original language setting.


Find Your Products By Category
Please Login
