
4.3
Owner's of the Samsung Blu-ray Player Blu-ray gave it a score of 4.3 out of 5. Here's how the scores stacked up:


|
20 English
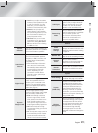
Settings
Language
You can select the language you prefer for the On-
Screen Menu, disc menu, etc.
• The selected language will only appear if it is
supported on the disc.
Security
The default PIN is 0000. Enter the default PIN to
access the security function if you haven't created your
own PIN.
BD Parental
Rating
Prevents playback of Blu-ray Discs
with a rating equal to or above a
specific age ratings unless the PIN
is entered.
DVD Parental
Rating
Prevents playback of DVDs with a
rating above a specific numerical
rating unless the PIN is entered.
Change PIN
Changes the 4-digit PIN used to
access security functions.
General
Time Zone
You can specify the time zone that
is applicable to your area.
Support
Software
Upgrade
For more information about the
Software Upgrade function, see
"Upgrading Software" on page 21.
Contact
Samsung
Provides contact information for
assistance with your product.
Terms of
Service
Agreement
View the general disclaimer
regarding third party contents and
services.
Reset
All settings will revert to the default
except for the network settings. The
default security password is 0000.
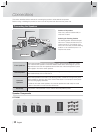
Networks and the Internet
When you connect this product to a network, you can
use network based applications and functions such as
BD-LIVE and upgrade the product's software through the
network connection.
Configuring Your Network Connection
If you skipped network setup during the Initial Setup,
follow the instructions below to configure the home
theater's network connection.
Before you begin, contact your ISP to find out if your
IP address is static or dynamic. If it is dynamic, we
recommend you use the automatic procedure below. If it
is static, you must use the manual procedure that follows.
• Before you begin, confirm that the product is
connected to your router with a network cable.
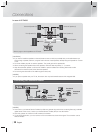
❑
Automatic
To start the configuration process, follow these steps:
1.
In the Home menu, select Settings, and then press
the
E
button.
2.
Select Network, and then press the
E
button.
3.
Select Wired Network Settings, and then press
the
E
button.
The Wired Network Settings screen appears.
4.
Press the
►
button on the Internet Protocol Setup
menu.
Use
▲▼
button to select Auto, and then press the
E
button.
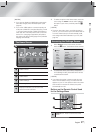
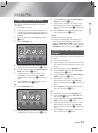
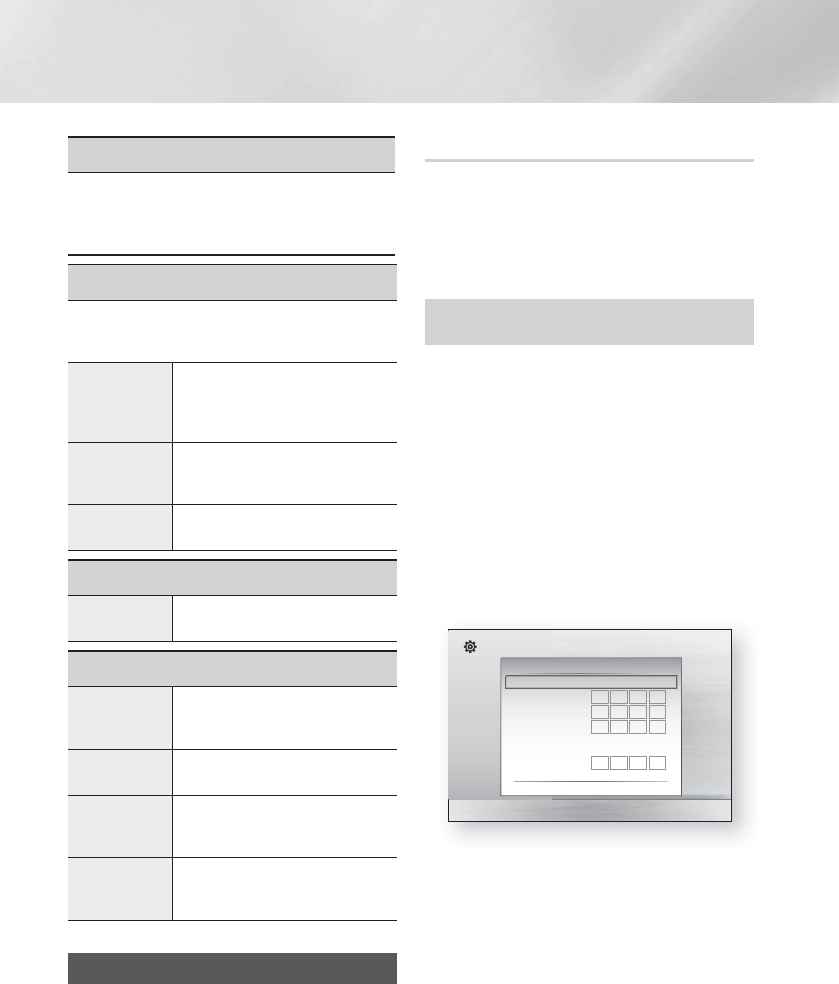
Settings
Display
Audio
Network
System
Language
Security
General
Support
Wired Network Settings
Internet Protocol Setup : Auto
\
IP Address :
0
0
0
0
Subnet Mask :
0
0
0
0
Gateway :
0
0
0
0
DNS : Auto
DNS Server :
0
0
0
0
>
Move
"
Select '
Return
5.
The Network function acquires and fills in the values
for IP Address, Subnet Mask, etc., automatically.
6.
After the Network function has acquired the network
values, press the RETURN (
'
) button.
7.
Select Network Test, and then press
E
. The
home theater validates the network connection.
When it is done, press the RETURN (
'
) button.
❑
Manual
If you have a static IP address or the Automatic procedure
does not work, you’ll need to set the Network Settings
values manually. You can get the Network Settings from
your Internet Service Provider (ISP).


Find Your Products By Category
Please Login
