

0
Owner's of the Frigidaire Range Frigidaire Electric Range gave it a score of 0 out of 5. Here's how the scores stacked up:

53
BEFORE YOU CALL
Soil not completely removed after
self clean.
Self clean was interrupted. Review instructions on “Self-Cleaning Operation” on
page 43. Excessive spills on oven bottom. Clean before starting self clean. Failure to
clean soil from the oven frame, the door liner outside the oven door gasket, and the
small area at the front center of the oven bottom. These areas are not in the self-
cleaning area, but get hot enough to burn on residue. Clean these areas before
starting the self-cleaning cycle. Burned-on residue can be cleaned with a stiff nylon
brush and water or a nylon scrubber. Be careful not to damage the oven gasket.
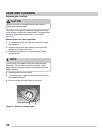
If your oven is cooking poorly or the Self Clean is performing badly, perform the
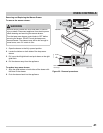
following check: Boil, Press the Up button, and “HI” should appear on the display.
Place your hand near the handle on the oven door. Between the door and the control
panel, you should feel a rush of air on your hand. If so, your unit is functioning
properly, and you have had a power failure in your home. If no air stream is present,
call a service technician to replace your cooling fan.
Convection fan does not rotate. Oven door is open. Convection fan will turn off if oven door is opened when convec-
tion is active. Close oven door.
Surface element is too hot or not
hot enough.
Incorrect surface control setting. Adjust power level setting.
Surface element does not heat or
does not heat evenly.
Be sure the correct surface control knob is turned on for element needed.
Lightweight or warped pans used. Use only flat, evenly balanced, medium or heavy-
weight cookware. Flat pans heat better than warped pans. Cookware materials and
weight of the material affect heating. Heavy and medium-weight pans heat evenly.
Because lightweight pans heat unevenly, foods may burn easily.
Scratches or abrasions on
cooktop surface.
Coarse particles such as salt or hardened soils between cooktop and utensils can
cause scratches. Be sure cooktop surface and bottoms of utensils are clean before
usage. Small scratches do not affect cooking and will become less visible with time.
Cleaning materials not recommended for ceramic-glass cooktop have been used.
Apply the recommended CookTop® Cleaning Creme to the ceramic surface (on the
web visit www.sears.com for replacement cooktop cleaner, item number 40079). Buff
with a non-abrasive cloth or sponge. For more information see
“Cooktop Mainte-
nance” on page 47.
Cookware with rough bottom was used. Use smooth, flat-bottomed cookware.
Metal marks on the cooktop. Sliding or scraping of metal utensils on cooktop surface. Do not slide metal utensils
on cooktop surface. Apply the recommended CookTop® Cleaning Creme to the
ceramic surface (on the web visit www.sears.com for replacement cooktop cleaner,
item number 40079). Buff with a non-abrasive cloth or sponge. For more information,
see
“Cooktop Maintenance” on page 47.
Brown streaks or specks on
cooktop surface.
Boilovers are cooked onto surface. Use razor blade scraper to remove soil. For more
information see
“Cooktop Maintenance” on page 47.
Appliance is not level. Be sure floor is level, strong, and stable enough to adequately support range.
If floor is sagging or sloping, contact a carpenter to correct the situation.
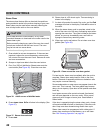
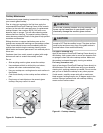
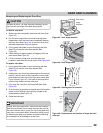
Poor installation. Place oven rack in center of oven. Place a level on the oven rack.
Adjust leveling legs at base of appliance until the rack is level.
Kitchen cabinet alignment may make range appear not level. Be sure cabinets are
square and have sufficient room for appliance clearance.


Find Your Products By Category
Please Login
