
4.8
Owner's of the Onkyo Stereo Receiver AV Receiver gave it a score of 4.8 out of 5. Here's how the scores stacked up:


22
En
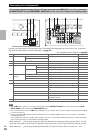
Note
• The following iPod models are not supported in Standard Mode.
These iPod models can only be controlled in Extended Mode.
– iPod with video
– iPod nano (1st generation)
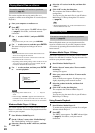
Extended Mode control
The content information is displayed (lists are displayed)
on-screen, and you can control the content while looking
at the screen.
Top screen list:
Playlists, Artists, Albums, Genres, Songs, Composers,
Shuffle Songs, Now Playing
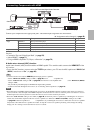
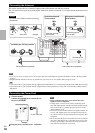
This section explains how to play music files from a USB
device (e.g., USB flash drives and MP3 players).
See also:
• “Network/USB Features” (➔ page 64).
Note
• If the media you connect is not supported, the message “No
Storage” will appear on the display.
• If you connect a USB hard disk drive to the AV receiver’s USB
port, we recommend that you use its AC adapter to power it.
• The AV receiver supports USB MP3 players that support the
USB Mass Storage Class standard, which allows USB devices to
be connected to computers without the need for special drivers
or software. Note that not all USB MP3 players support the USB
Mass Storage Class standard. Refer to your USB MP3 player’s
instruction manual for details.
• Protected WMA music files on an MP3 player cannot be played.
• Onkyo accepts no responsibility whatsoever for the loss or
damage to data stored on a USB device when that device is used
with the AV receiver. We recommend that you back up your
important music files beforehand.
• MP3 players containing music files that are managed with
special music software are not supported.
• Operation is not guaranteed for all USB devices, which includes
the ability to power them.
• Do not connect your USB device via a USB hub. The USB
device must be connected directly to the AV receiver’s USB
port.
• If the USB device contains a lot of data, the AV receiver make
take a while to read it.
• USB devices with security functions cannot be played.
• Do not disconnect the USB device or USB cable that comes with
iPod/iPhone to the USB port at the front of the AV receiver,
while the message “Connecting...” appears on the display.
You can select Internet radio stations by connecting to the
AV receiver from your computer and selecting stations in
your web browser.
Internet radio URLs in the following formats are
supported: PLS, M3U, and podcast (RSS). However,
depending on the type of data or audio format used by the
Internet radio station, you may not be able to listen to
some stations.
Note
• Services available may vary depending on the region. See the
separate instructions for more information.
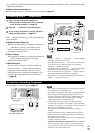
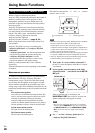
Listening to vTuner Internet Radio
This unit includes the full vTuner Internet Radio Service
at no additional charge. Once you have connected your
unit to the Internet you can select vTuner Internet Radio to
search for and play Internet radio stations and podcasts at
any time. To enhance your Internet radio experience, the
http://onkyo.vtuner.com/ portal is available to you as an
easy way to browse to find stations, set up/organize your
favorites, add your own stations, get help, etc. After the
first time you try vTuner Internet Radio on your unit you
can use the MAC Address of your unit to create a member
login account (email address and password) on the
http://onkyo.vtuner.com/ portal. To verify your MAC
Address, please see “Network Setup” (➔ page 49).
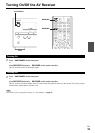
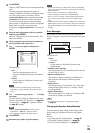
Playing a USB Device
1
Press USB to select the “USB” input.
2
Plug your USB device into the AV receiver’s USB
port.
The USB indicator lights (➔ page 8). It will flash if
the AV receiver cannot read the USB device.
3
Press ENTER.
A list of the device’s contents appears. To open a
folder, use / to select it, and then press ENTER.
4
Use / to select a music file, and press ENTER or
to start playback.
Listening to Internet Radio
You need to connect the AV receiver to your home
network (➔ page 64).
1
Press NET.
The “NET” screen appears, and the NET indicator
lights (➔ page 8). If it flashes, verify that the
Ethernet cable is firmly connected to the AV receiver.
2
Use / to select “vTuner Internet Radio” and
then press ENTER.


Find Your Products By Category
Please Login
