
4.8
Owner's of the Onkyo Stereo Receiver AV Receiver gave it a score of 4.8 out of 5. Here's how the scores stacked up:


17
En
• If your Blu-ray Disc/DVD player has both the main stereo and multichannel outputs, be sure to connect the main stereo
output using connection .
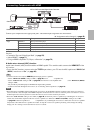
■ How to record a video source
See “Recording” to make a connection for video recording (➔ page 37).
With (Remote Interactive), you can use the following
special functions:
■ System On/Auto Power On
When you start playback on a component connected via
, while the AV receiver is on Standby, the AV
receiver will automatically turn on and select that
component as the input source.
■ Direct Change
When playback is started on a component connected via
, the AV receiver automatically selects that
component as the input source.
■ Remote Control
You can use the AV receiver’s remote controller to
control your other -capable Onkyo components,
pointing the remote controller at the AV receiver’s
remote control sensor instead of the component. You
must enter the appropriate remote control code first
(➔ page 56).
Note
•Use only cables for connections. cables are supplied
with Onkyo players (DVD, CD, etc.).
• Some components have two jacks. You can connect either
one to the AV receiver. The other jack is for connecting
additional -capable components.
• Connect only Onkyo components to jacks. Connecting other
manufacturer’s components may cause a malfunction.
• Some components may not support all functions. Refer to
the manuals supplied with your Onkyo components.
• While Zone 2 is on, the System On/Auto Power On and Direct
Change functions do not work.
See “Recording” on the recording (➔ page 37).
Note
• The AV receiver must be turned on for recording. Recording is
not possible while it’s in Standby mode.
• If you want to record directly from your TV or playback VCR to
the recording VCR without going through the AV receiver,
connect the TV/VCR’s audio and video outputs directly to the
recording VCR’s audio and video inputs. See the manuals
supplied with your TV and VCR for details.
• Video signals connected to composite video inputs can be
recorded only via composite video outputs. If your TV/VCR is
connected to a composite video input, the recording VCR must
be connected to a composite video output.
• The surround sound and DSP listening modes cannot be
recorded.
• Copy-protected Blu-ray discs and DVDs cannot be recorded.
• Sources connected to a digital input cannot be recorded. Only
analog inputs can be recorded.
• DTS signals will be recorded as noise, so don’t attempt analog
recording of DTS CDs or LDs.
• (European, Australian and Asian models) While the listening
mode is set to Pure Audio, no image is provided because the
power is turned off for the video circuit. If you want to make
recordings, select other listening mode.
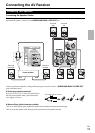
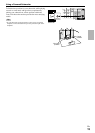
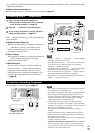
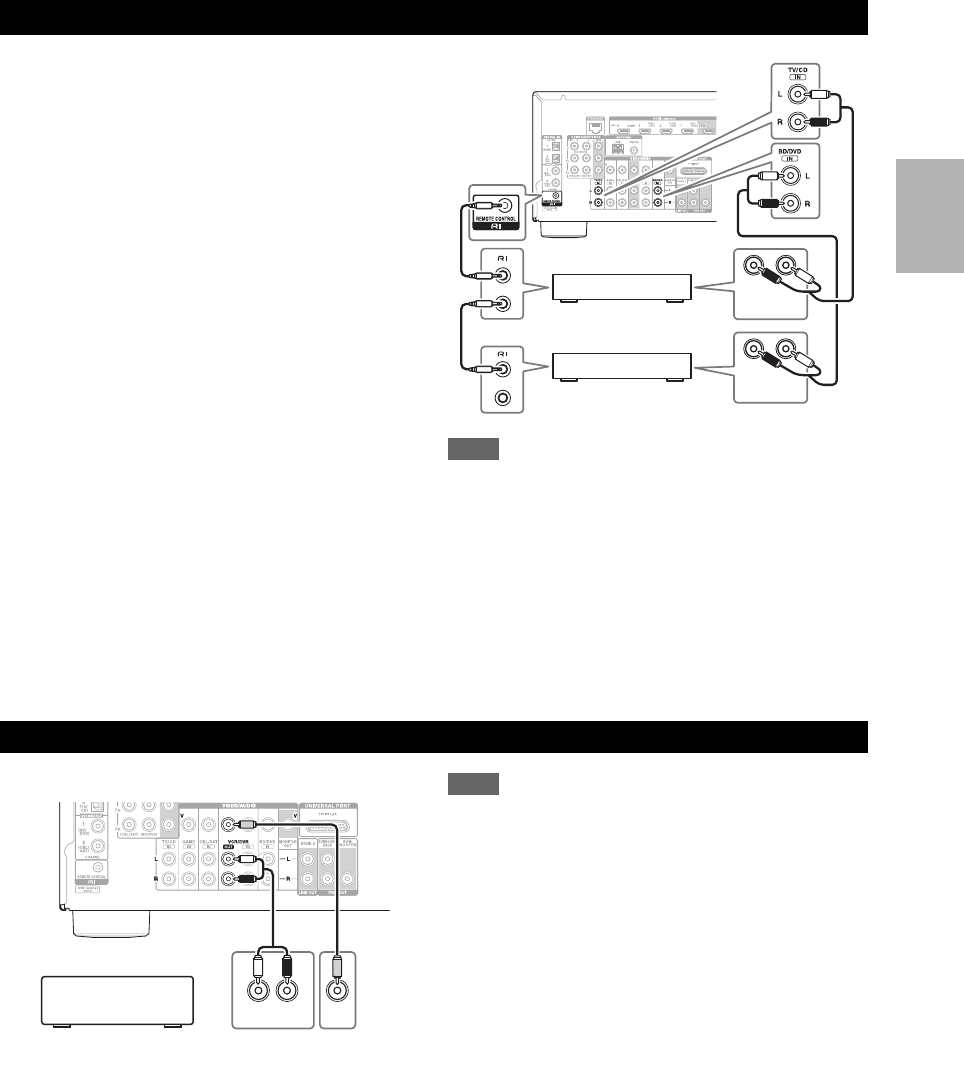
Connecting Onkyo Components
1
Make sure that each Onkyo component is
connected with an analog audio cable (connection
in the hookup examples) (➔ page 16).
2
Make the connection (see the illustration).
3
If you’re using an RI Dock, or cassette tape deck,
change the Input Display (➔ page 37).
LR
ANALOG
AUDIO OUT
LR
ANALOG
AUDIO OUT
e.g., CD player
e.g., DVD player
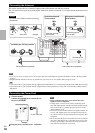
Connecting a Recording Component
AUDIO
IN
LR
VIDEO
IN
VCR, DVD recorder,
cassette tape deck,
CDR, MD recorder, etc.


Find Your Products By Category
Please Login
