
0
Owner's of the Onkyo Stereo Receiver AV Receiver gave it a score of 0 out of 5. Here's how the scores stacked up:

Appendix
En-106
■ When performing Automatic Speaker Setup, the
measurement fails and the message “Ambient
noise is too high.” is displayed.
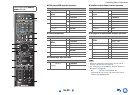
■ The following settings can be made for the
composite video inputs
You must use the buttons on the unit to make these
settings.
On the AV receiver, press the input selector for the input
source that you want to set and the SETUP button
simultaneously. While holding down the input selector
button, press SETUP until “Video ATT :On” appears
on the AV receiver’s display. Then, release both buttons.
To turn the setting off, repeat the above process so that
“Video ATT :Off” appears on the AV receiver’s
display, and release the buttons.
• Video Attenuation
This setting can be made for the BD/DVD, CBL/SAT,
STB/DVR, GAME 1, AUX, or USB input.
If you have a game console connected to the composite
video input, and the picture isn’t very clear, you can
attenuate the gain.
Video ATT :Off: The gain is not changed (default).
Video ATT :On: The gain is reduced by the values
specified below.
– 2 dB for the ZONE 2 OUT V and HDMI output.
– 6 dB for the MONITOR OUT V output.
Note
• With the USB input selector, this setting is only available when
an iPod/iPhone is connected and set to Extended Mode (Video)
or Standard Mode.
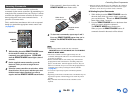
■ If the picture on your TV/monitor connected to
the HDMI output is unstable, try switching the
DeepColor function off
To turn off the DeepColor function, simultaneously
press the STB/DVR and ON/STANDBY buttons on
the AV receiver. While holding down STB/DVR, press
ON/STANDBY until “Deep Color:Off” appears on
the AV receiver’s display. Then, release both buttons.
To reactivate the DeepColor function, repeat the above
process until “Deep Color:On” appears on the AV
receiver’s display and release the buttons.
The AV receiver can upconvert component video and
composite video sources for display on a TV connected to
the HDMI output. However, if the picture quality of the
source is poor, upconversion may make the picture worse
or disappear altogether.
In this case, try the following:
Tip
• To by-pass the upconversion, set the “Picture Mode” setting to
“Direct” (➔ page 78).
This can be caused by a malfunction in your speaker
unit. Check if the unit produces normal sounds.
—
The AV receiver contains a microcomputer for signal
processing and control functions. In very rare situations,
severe interference, noise from an external source, or
static electricity may cause it to lockup. In the unlikely
event that this happens, unplug the power cord from the
wall outlet, wait at least five seconds, and then plug it
back in.
Onkyo is not responsible for damages (such as CD rental
fees) due to unsuccessful recordings caused by the unit’s
malfunction. Before you record important data, make
sure that the material will be recorded correctly.
Before disconnecting the power cord from the wall
outlet, set the AV receiver to standby.
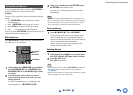
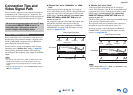
Important Note Regarding Video Playback
1
If the video source is connected to a component
video input, connect your TV to COMPONENT
VIDEO MONITOR OUT.
If the video source is connected to a composite video
input, connect your TV to MONITOR OUT V.
2
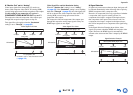
On the main menu, select “Input/Output Assign”,
and then “Component Video Input” (➔ page 65).
If the video source is connected to COMPONENT
VIDEO IN 1, select the relevant input selector, and
assign it to “IN1”.
If the video source is connected to COMPONENT
VIDEO IN 2, select the relevant input selector, and
assign it to “IN2”.
If the video source is connected to a composite video
input, select the relevant input selector, and assign it to
“-----”.


Find Your Products By Category
Please Login
