
0
Owner's of the Onkyo Stereo Receiver Network A/V Receiver gave it a score of 0 out of 5. Here's how the scores stacked up:

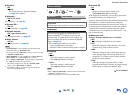

Advanced Operations
En-76
■ Resolution
*4*6*8*9*10
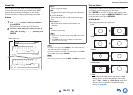
`Through:
Select this to pass video through the AV receiver at
the same resolution and with no conversion.
`Auto:
Select this to have the AV receiver automatically
convert video at resolutions supported by your TV.
`480p (480p/576p), 720p, 1080i, 1080p:
Select the desired output resolution.
`1080p/24:
Select this for 1080p output at 24 frames per second.
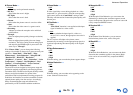
`4K Upscaling:
Select this for an output resolution four times that of
1080p. Depending on the resolution supported by
your TV, it will result in either 3840 × 2160 or 4096
× 2160 pixels.
You can specify the output resolution for the HDMI output
and have the AV receiver upconvert the picture resolution
as necessary to match the resolution supported by your TV.
This setting is available only when “Source” has been
selected in “Resolution” of the “Monitor Out” setting
(
➔ page 60).
■ Brightness
*1*4*6
`–50 to 0 to +50
With this setting, you can adjust the picture brightness.
“–50” is the darkest. “+50” is the brightest.
■ Contrast
*1*4*6
`–50 to 0 to +50
With this setting, you can adjust contrast. “–50” is the
least. “+50” is the greatest.
■ Hue
*1*4*6
`–50 to 0 to +50
With this setting, you can adjust the color hue between
“–50” and “+50”.
■ Saturation
*1*4*6
`–50 to 0 to +50
With this setting, you can adjust saturation. “–50” is the
weakest color. “+50” is the strongest color.
■ Color Temperature
*4*6
`Warm
`Normal
`Cool
With this setting, you can adjust the color temperature.
■ Gamma
*4*6
`–3 to 0 to +3
With this setting, you can adjust the incoming picture’s R
(red), G (green), and B (blue) color signal in relation to the
output color signal.
■ Red Brightness
*4*6
`–50 to 0 to +50
With this setting you can adjust the brightness of red color.
“–50” is the darkest. “+50” is the brightest.
■ Red Contrast
*4*6
`–50 to 0 to +50
With this setting you can adjust the contrast of red color.
“–50” is the least. “+50” is the greatest.
■ Green Brightness
*4*6
`–50 to 0 to +50
With this setting you can adjust the brightness of green
color. “–50” is the darkest. “+50” is the brightest.
■ Green Contrast
*4*6
`–50 to 0 to +50
With this setting you can adjust the contrast of green color.
“–50” is the least. “+50” is the greatest.
■ Blue Brightness
*4*6
`–50 to 0 to +50
With this setting you can adjust the brightness of blue
color. “–50” is the darkest. “+50” is the brightest.
■ Blue Contrast
*4*6
`–50 to 0 to +50
With this setting you can adjust the contrast of blue color.
“–50” is the least. “+50” is the greatest.
Note
•“Picture Adjust”
cannot be used when:
–The NET input selector is selected, or
–“Monitor Out” is set to “Sub” (➔ page 60).
•“Picture Adjust” can be used when the USB input selector is
selected; however, only when iPod/iPhone is connected and
Standard Mode or Extended Mode (Video) is selected.
*1
This procedure can also be performed on the remote controller
by using the Quick Setup (➔ page 54).
*2
When a 3D video source is input, “Wide Mode” is fixed to
“Full”.
*3
When “Metadata Compatible” is enabled (➔ page 67),
“Picture Mode” is fixed to “Direct”.
*4
When the “Picture Mode” setting is set to anything other than
“Custom”, this setting cannot be used.
*5
If the “Resolution” setting is set to “4K Upscaling”
(➔ pages 60, 76), this setting is fixed at “Off”.
*6
Press CLR if you want to reset to the default value.
*7
When the “Noise Reduction” setting is set to anything other
than “Off”, this setting cannot be selected.
*8
With some TVs, there may be no picture when this setting is
set to “4K Upscaling”.
*9
When “Resolution” is set to “1080p/24” or “4K Upscaling”
while “Monitor Out” is set to “Analog”, the video is output in
1080i.
*10
When “Resolution” is set to “Auto” while “Monitor Out” is
set to “Analog”, the video is output as “Through”.


Find Your Products By Category
Please Login
