
0
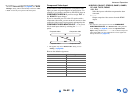
Owner's of the Onkyo Stereo Receiver Network A/V Receiver gave it a score of 0 out of 5. Here's how the scores stacked up:


Advanced Operations
En-66
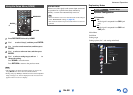
Level Calibration
Here you can adjust the level of each speaker with the
built-in test tone so that the volume of each speaker is the
same at the listening position.
■ Left, Front Wide Left, Front High Left, Center
*1
,
Front High Right, Front Wide Right, Right,
Surround Right, Surround Back Right, Surround
Back Left, Surround Left
`–12.0dB to 0.0dB to +12.0dB in 0.5 dB steps.
■ Subwoofer 1
*1
, Subwoofer 2
*1*2
`–15.0dB to 0.0dB to +12.0dB in 0.5 dB steps.
Note
• These settings cannot be calibrated when the AV receiver is
muted.
• Speakers that you set to “No” or “None” in “Speaker
Configuration” cannot be selected (➔ page 64).
•When the “Powered Zone 2” setting is set to “Yes” and Zone 2
is turned on, the surround back and front high speakers cannot be
used.
•When the “Powered Zone 3” setting is set to “Yes” and Zone 3
is turned on, the surround speakers cannot be used.
• The test tone is output at the standard level for THX, which is
0 dB (absolute volume setting 82). If you normally listen at
volume settings below this, be careful because the test tone will
be much louder.
*1
For the center speaker and subwoofer, the level settings made
by using the Quick Setup are saved in this menu (➔ page 56).
*2
If the “Subwoofer” setting is set to “1ch”, this setting cannot
be selected (➔ page 64).
Tip
• If you’re using a handheld sound level meter, adjust the level of
each speaker so that it reads 75 dB SPL at the listening position,
measured with C-weighting and slow reading.
Equalizer Settings
With the Equalizer settings, you can adjust the tone of
speakers individually with a 7-band equalizer. The volume
of each speaker can be set (➔ page 66).
■ Manual Equalizer
`On:
You can adjust the equalizer for each speaker
manually. Continue with the following procedure:
`Off
:
Tone off, response flat.
Note
• When the Direct or Pure Audio listening mode is selected, the
equalizer settings have no effect.
• If “Audyssey” is enabled, it prevails over this setting
(➔ page 72).
THX Audio Setup
■ Surr Back Speaker Spacing
`<1ft (<0.3m)
`1ft-4ft (0.3m-1.2m)
`>4ft (>1.2m)
You can specify the distance between your surround back
speakers.
Note
• This setting is not available in any of the following cases:
–“Surround Back” is set to “None” (➔ page 64).
–“Surround Back Ch” is set to “1ch” (➔ page 65).
–“Powered Zone 2” is set to “Yes” (➔ page 63) and Zone 2
turned on (➔ page 85).
■ THX Ultra2/Select2 Subwoofer
`No
`Yes
If you’re using a THX-certified subwoofer, set this setting
to “Yes”.
Note
• If the “Subwoofer” setting is set to “No”, this setting cannot be
selected (➔ page 64).
■ BGC
`Off
`On
You can apply THX’s Boundary Gain Compensation
(BGC) to compensate the perceived exaggeration of low
frequencies for listeners sitting very close to a room
boundary (i.e., wall).
Note
• This setting is only available if “THX Ultra2/Select2
Subwoofer” is set to “Yes”.
• If the “Subwoofer” setting is set to “No”, this setting cannot be
selected (➔ page 64).
This setting is set automatically by
Audyssey MultEQ
®
XT32 Room Correction and
Speaker Setup (➔ page 39).
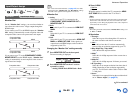
1
Press to select “Channel”, and then use / to
select a speaker.
2
Use / to select a frequency, and then use the /
to adjust the level at that frequency.
The volume at each frequency can be adjusted from
–6dB to 0dB to +6dB in 1 dB steps.
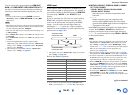
Tip
• You can select: “63Hz”, “160Hz”, “400Hz”, “1000Hz”,
“2500Hz”, “6300Hz”, or “16000Hz”. And for the
subwoofer, “25Hz”, “40Hz”, “63Hz”, “100Hz”, or
“160Hz”.
• Low frequencies (e.g., 63 Hz) affect bass sounds; high
frequencies (e.g., 16000 Hz) affect treble sounds.
3
Use to select “Channel”, and then use / to
select another speaker.
Repeat steps 1 and 2 for each speaker.
You cannot select speakers that you set to “No” or
“None” in the “Speaker Configuration”
(➔ page 64).


Find Your Products By Category
Please Login
