
0
Owner's of the Onkyo Stereo Receiver Network A/V Receiver gave it a score of 0 out of 5. Here's how the scores stacked up:


Appendix
En-112
■ How to connect and setup
1
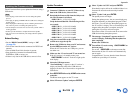
Confirm the connection and settings.
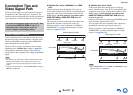
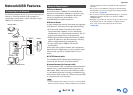
1. Connect the HDMI OUT MAIN jack to the HDMI
input jack of the TV.
2. Connect the audio output from the TV to the
OPTICAL IN 2 jack of the AV receiver using an
optical digital cable.
Note
• When the audio return channel (ARC) function is used with
an ARC capable TV, this connection is not necessary
(➔ page 80).
3. Connect the HDMI output of the Blu-ray
Disc/DVD player/recorder to the HDMI IN 1 jack
of the AV receiver.
Note
• It is necessary to assign the HDMI input when connecting
the Blu-ray Disc/DVD player/recorder to other jacks
(➔ page 61). Do not assign an HDMI IN to the TV/CD
selector at this time, otherwise appropriate CEC (Consumer
Electronics Control) operation will not be guaranteed.
Blu-ray Disc/DVD player, etc.
AV receiver
TV, projector, etc.
DIGITAL AUDIO
connection
(OPTICAL)
HDMI
connection
HDMI
connection
2
Change each item in the “HDMI” menu according
to the following settings:
• HDMI Control(RIHD): On
• Audio Return Channel (ARC): Auto
See details of each setting (➔ pages 79, 80).
3
Confirm the settings.
1. Turn on the power for all connected components.
2. Turn off the power of the TV, and confirm that the
power of the connected components is turned off
automatically with the link operation.
3. Turn on the power of the Blu-ray Disc/DVD
player/recorder.
4. Start playback on the Blu-ray Disc/DVD
player/recorder, and verify the following:
• The AV receiver automatically turns on, and
selects the input to which the Blu-ray
Disc/DVD player/recorder is connected.
• The TV automatically turns on, and selects the
input to which the AV receiver is connected.
5. Following the operating instructions of the TV,
select “Use the TV speakers” from the menu
screen of the TV, and confirm that the audio is
output from the speakers of the TV, and not from
the speakers connected to the AV receiver.
6. Select “Use the speakers connected from the AV
receiver” from the menu screen of the TV, and
confirm that the audio is output from the speakers
connected to the AV receiver, and not from the
TV speakers.
Note
• Perform the above operations when you use the AV receiver
for the first time, when the settings of each component are
changed, when the main power of each component is turned
off, when the power cable is disconnected from the power
supply, or when there has been a power outage.
4
Operate with the remote controller.
For buttons that can be operated (➔ page 93).
Note
• Audio from DVD-Audio or Super Audio CD may not output
from the TV speakers. You will be able to output the audio
from the TV speakers by setting the audio output of the
DVD player to 2ch PCM. (It may not be possible depending
on the player models.)
• Even if you set to output audio on the TV speakers, audio
will be output from the speakers connected to the AV
receiver when you adjust the volume or switch the input on
the AV receiver. To output audio from the TV speakers, re-
do the corresponding operations on the TV.
• In case of an connection with and audio
control compatible components, do not connect the
cable at the same time.
• On the TV, when you select anything other than the HDMI
jack to which the AV receiver is connected, the input on the
AV receiver will be switched to “TV/CD”.
• The AV receiver will automatically power on in conjunction
when it determines it to be necessary. Even if the AV
receiver is connected to an compatible TV or
player/recorder, it will not power on if it is not necessary. It
may not power on in conjunction when the TV is set to
output audio from the TV.
• Linked functions with the AV receiver may not work
depending on the component model connected. In such
cases, operate the AV receiver directly.


Find Your Products By Category
Please Login
